When we fire glass in a kiln, we take it through four stages: Heating, Forming, Annealing, Cooling. Don't confuse these stages with the segments of a firing schedule; they're not the same. The firing schedule is a set of instructions meant to be entered into the electronic kiln controller. The stages are the phases the glass goes through during the firing process.
First, we heat the glass up ...
First, we heat the glass up. The Heating Stage. Imagine a hunk of cold glass the size and shape of a paperback book. Like most cold glass, it is brittle. Laying flat on a kiln shelf, it has a top and bottom surface and four exposed sides. It also has an interior (anywhere inside the glass, between the exposed surfaces). If we heat this hunk of glass too quickly, the surfaces, because they lay bare to the heating elements, will expand faster than the interior of the glass, creating tension and, since the glass is brittle, probably breakage.
The only solution is to heat slow enough so that the exterior expands no faster than the interior. Understanding that, it’s easy to see why “slow enough” depends on the thickness of the glass. A single thickness of 3mm (1/8 in)-thick common fusing glass can be heated quite quickly without much risk. A double thickness, on the other hand, must be heated considerably slower. A half-inch (12mm) thickness? Slower still. Think about it: you are trying to heat such that the exterior surface of the glass — the surface exposed to the heating elements — never gets much hotter than its deepest interior point.
How do you know where to start? You follow guidelines published by the glass or kiln manufacturers. These guidelines are general — they're intended to apply to a broad range of projects that fall into specific thickness ranges. For example, the Uroboros Glass guidelines currently suggest a heating rate of 300 degrees (F) per hour for projects 1/4-inch (6mm) thick. Their recommendations range from there all the way down to a sluggish 50 degrees per hour for projects 8-inches (203 mm) thick! Kiln manufacturer Skutt, who includes the optional GlassFire Mode pre-programed into many of their controllers, uses three heating rates, meant to be selected based on the size and thickness of a project: 300, 500, or 800 degrees per hour. Evenheat has a similar approach, called Preset Express Mode. Their auto-rates range from 200 to 500 degrees per hour, again, user-selected depending on project dimensions.
... until it gets thoroughly soft — i.e., no longer brittle.
So we heat … nice and slow. We heat until the glass gets thoroughly soft — i.e., no longer brittle. Usually, we hold at a softening temperature, commonly around 1100 F, soaking the project, making sure it is uniformly soft, before going hotter. Since we have no way of measuring the distribution of heat throughout the glass, we soak it for a period we believe to be “long enough.” Again, check the published guidelines. My rule of thumb for everyday projects is half-an-hour.
Now we’re free to let loose and really fire. The glass is no longer brittle — it won't matter if the surface heats faster than the interior because it is thoroughly soft. Well, let’s say it’s “elastic” — probably not yet pliable enough to slump under its own weight, but yielding enough so that that irregular expansion shouldn’t cause it to crack. So we can move on to the next stage anxiety-free.
Now our project can begin to take shape ...
Next stage: Forming. This is where heat will accomplish our goal in this firing. We may be slumping a bowl, or bonding multiple pieces into a whole, or any number of other efforts, like fire polishing or pot melting. What you do here depends entirely on what you want to accomplish, of course, and published guidelines that usually suggest a target temperature range depending on your “desired effect” or your “specific needs”. Warm glass terminology has settled (for now) on a few simple categories: slump, tack fuse, contour fuse, full fuse. The manufacturer’s guidelines might suggest a heating rate of 300 F and a temperature-time range of 1450-1465 F for 10 minutes to achieve a full fuse. Ok fine. That's a smart place to start if you have nothing else (like experience and good firing records) to influence your choices.
Third stage: annealing
The next stage is Annealing. Choose the optimum temperature recommended by the glassmaker (950 F for System 96, 900 F for Bullseye), and it’s safe to drop to that temperature at a high rate. Fleeing the forming range of temperatures quickly will also help prevent over-forming. Most firing instructions will suggest a rate of “AFAP” (as fast as possible) or “9999”, which means the same thing to your kiln controller.
What is annealing? After all that expansion and contraction the internal stresses that have built up in the glass need time to heal. If you want a scientific explanation, try this one: https://en.wikipedia.org/wiki/Annealing_(glass) The annealing period is critical to winding up with an unbroken piece of glass that is reasonably free of internal stress which might cause it to crack in the future.
The amount of time a project needs to anneal adequately is directly related to its thickness. Follow your manufacturer’s guidelines. Self-calculation requires some serious mathematics. When we form stringers in a torch the threads are so thin that they anneal in the time it takes to dissipate their own heat. Toy marbles are formed as they roll down a short trough, where they fall into a bucket and anneal on their own, nestled in the heat of surrounding marbles. The famous “continuous ribbon” of 1/8-inch sheet glass in Spectrum’s glassmaking process goes from molten to cut-and-packed in something like 20 minutes, but they recommend over five hours of annealing for a 1-inch thick project. And for big-picture perspective, the 200-inch glass mirror at the Palomar Observatory annealed for a full year!
and finally ... Cooling
After we complete the Annealing Stage, all that remains is the safe cooling of the project to room temperature — the Cooling Stage. This is the reverse of the Heating Stage but the challenges are much the same. By now the glass is somewhere around 800-900 degrees and is “brittle” again. We must control the rate of cooling such that the its interior and exterior temperatures remain relatively uniform. How fast is safe will depend largely on project thickness, and your project may be considerably thicker now than when you started. An assemblage of individual 3mm-thick glass pieces can be heated fairly quickly (after all, there's no piece thicker than 3mm) but after fusing, the project is a unified whole and must be treated as such. What do the manufacturer’s recommend? Generally, around 300 degrees/hour. You needn't control the cooling all the way to room temperature — 200 degrees or so is recommended. From there, just allow the kiln to naturally dissipate its heat.
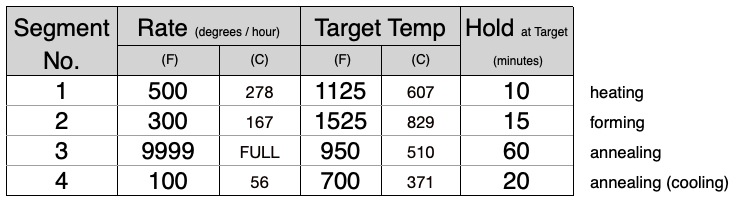
So those are the four principle stages of firing glass in a kiln: Heating, Forming, Annealing, Cooling. Together they comprise a single firing cycle (room temp to room temp). When each of the four stages is accomplished with a single segment of a firing schedule*, you have a simple four-segment firing schedule, like Figure 1.
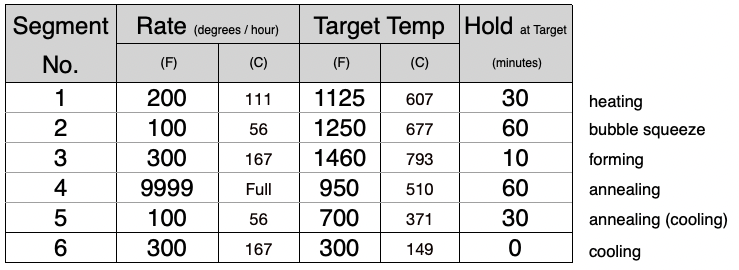
This schedule is perfectly adequate for small, simple projects, but for many others, it would never do. As our projects and firing goals get more complex we often use additional segments in the schedule to address their requirements. The most common are an extra segment in the Heating Stage to help reduce bubbles (the “Bubble Squeeze”) and another in the Annealing Stage to make certain that crucial process is fully accomplished. With these two add-on segments we now have a 6-segment cycle (Figure 2).
The manufacturers face a real challenge when it comes to publishing firing guidelines. They're forced to deal in generalities (because they can't possibly know the specifics of your project) and generalities can never address all possibilities, which means there will be exceptions. Those exceptions will appear in the form of ruined projects and angry customers. Their options are to not publish firing guidelines at all (Bullseye*) or to publish guidelines so conservative that only rare extremes will fail (Spectrum).
That's how most of us learn to cook!
Our choices really come down to time, don’t they? If time were of no concern we might plug in a super-ultra-conservative full-fuse schedule and default to it regardless of project size/thickness. But, I think, most of us are a little more practical than that. I am unlikely to run a twelve-hour cycle when eight-hours will do.
Personally, I am a proponent of project-specific firing schedules — like a cake recipe. A recipe gives us a time and a temperature that has (presumably) been tested on that specific recipe. We plug the numbers into our oven and enjoy a reasonable expectation that our results will be similar to the chef’s. After following lots of recipes, our understanding grows and we can confidently begin to vary things to our liking, even experiment on our own. That's how most of us learn to cook!
© 2022 Glasshoppa Glass Arts LLC • all rights reserved